An assembly drawing is a drawing of an entire machine with each part located and identified. After each part of a machine is manufactured, the assembly drawing shows us how to put these parts together.
A complete assembly drawing also includes a standard parts sheet. This sheet contains information about purchased items that are part of the machine . . . this combined with other drawings constitute what is called a "working drawing package".
Working Drawing Package: A packet of drawings that gives the specifications necessary to manufacture a design. A typical working drawing package includes an assembly drawing, detailed drawings and a standard parts sheet.


Sub-assembly: Two or more parts that form a
portion of an assembly. Can you think of some
examples of sub-assemblies?

Drawings included in a working drawing package should be presented in the following order.
An assembly drawing is a drawing of an entire machine or system with all of its components located and identified.


Detail drawing: A detail drawing is a drawing of an individual part (part number 1 etc), which includes an ORTHOGRAPHIC PROJECTION and dimensions. One detail and/or part per sheet. The purpose of the detail drawing is to show SIZE.

Assembly drawing: An assembly consists of a number of parts that are joined together to perform a specific function (like a bicycle). The assembly may be disassembled without destroying any part of the assembly. An assembly drawing shows the assembled machine or structure with all of the parts in their functional position.
An assembly drawing does not normally show size. The purpose of an assembly drawing is to LOCATE parts.
Do assembly drawings need a FRONT, TOP and RIGHT SIDE view? Sometimes. We need as many views as it takes to identify and locate each part. It may only take one view.
Section Lines: Section lines in adjacent parts are drawn in opposing directions.

Other information can be included, such as, stock sizes of materials and weights of the parts. Parts are listed in order of their part#. Part#’s are usually assigned based on the size or importance of the part. The parts list may be placed in the upper right corner of the drawing (Part# 1 is at the top.) The parts list may be placed in the lower right corner of the drawing. (Part# 1 is at the bottom.)


Consider the Clamp shown. Sheets of an incomplete working drawing package are given in your textbook. Complete/draw the assembly drawing, the detailed drawings off the individual parts and create a standard parts sheet.

Review the figures shown below, then answer questions 1 through 4. Be sure that you know WHY the answer you choose is correct.
1) How many sheets will be contained in our working drawing package?
2) What sheet number is part#1?
3) What sheet number is the assembly drawing?
4) How many parts will we need to draw a detailed draw of?
To answer question #1: Go back and review what a completed working drawing package includes. Do you remember the drawings (and their proper order) that should be included in a working drawing package?
To answer question #2: To answer this question you must recall the proper order of the drawings indicated in the review of question #1. When you determine this, you will be able to answer question #2.
After following the instructions on figure (1) above, review the drawing shown to check your work.

After following the instructions on figure (2) above, review the drawing shown to check your work.

After following the instructions on figure (3) above, review the drawing shown to check your work.

After following the instructions on figure (4) above, review the drawing shown to check your work.

The last step is to create an assembly drawing. When developing an idea or a design concept, the assembly comes first. However, once the design is complete and you are ready to draw the final working drawing package using a computer drawing software, the assembly drawing is completed last. This is simply out of convenience. The assembly drawing is simply constructed by assembling the already drawn details.
After following the instructions on figure (5) above, review the drawing shown to check your work.

PRACTICE PROBLEM 1:
Problem 1: Create a working drawing package for the following Linear Bearing. The working drawing package should contain an assembly drawing, details of all the parts, and a standard parts sheet. Notice that some of the dimensioned isometric drawings are not dimensioned using proper dimensioning techniques. When drawing the detailed drawings use proper symbols and dimensioning techniques.
Post all the required drawing/drawings via eDrawing format on the BlackBoard assignment under the homework tab entitled "Linear Bearing". I am not going to give you detailed instructions on exactly how to accomplish this . . .
I want you to review the material on this lesson, I want you to use your SolidWorks skills, I want you to do the best you can and justify (explain) the way (format) you have chosen to post this assignment.
Were you able to follow the directions to the letter, or because of various reasons (such as
differing skill levels), did you have to modify them because you couldn't figure out how to do
a title block as shown, or how to create a multi-page drawing and post it in eDrawing format.
You should have only one drawing file, but you should have multiple pages within that one file. You may have questions about how to do this, if so, I want you to use your best judgment and submit these drawings in the way that you think best (not every student is at the same skill level).
Part of the assignment will be an explanation (justification) of why you submitted your assignment a particular way that was not exactly according to the directions. Just tell me why you submitted individual drawing files or why you chose to submit only one drawing file with multiple pages etc).
Many times (in the real world) it often unclear as to how to proceed. "The professional" is not expected to read the bosses mind, but he is expected to use his best judgment and to then "justify" why he did things a particular way. If needed, such an explanation is part of your assignment on this project.

1) Draw a detailed drawing of the Bottom Plate (Part#1). If you
are just studying the basics and have not covered threads and fasteners,
replace the 12X 10 - 24 UNC dimension with a 12X n.19 dimension. When you have completed the drawing check with image at end of lesson below.
Use the information provided, the solutions will be revealed in later images.
Draw a detailed drawing of the Guide Shaft (Part#2). If you are just studying the basics and have not covered tolerancing, ignore the RC4 tolerance. NOTE: This part is symmetric and all fillets are R.12. When you have completed the drawing check with image at end of lesson below .
Use the information provided, the solutions will be revealed in later images.
Draw a detailed drawing of the Top Plate (Part#3). If you are just studying the basics and have not covered threads and fasteners, replace the 16X 10 - 24 UNC dimension with a 16X n.19 dimension. When you have completed the drawing check with image at end of lesson below.
Use the information provided, the solutions will be revealed in later images.
Draw a detailed drawing of the Pillow Block (Part#4). If you are just studying the basics and have not covered tolerancing, ignore the FN1 dimension. When you have completed the drawing check with image at end of lesson below.
Use the information provided, the solutions will be revealed in later images.
Draw a detailed drawing of the Bearing (Part#5). If you are just studying the basics and have not covered tolerancing, ignore the FN1and RC4 dimensions. When you have completed the drawing check with image at end of lesson below.
Use the information provided, the solutions will be revealed in later images.
Using the format given in figure (F), create a standard parts sheet.
Draw a complete assembly drawing. When you have completed the drawing. Use the information provided, the solutions will be revealed in later image.
Answer to figure (A)
 Answer to Figure (B)

Answer to Figure (C)

Answer to Figure (D)

Answer to Figure (E)

Answer to Figure (F)
 Answer to Figure (G)

The End of lesson on Assembly Drawings
A complete assembly drawing also includes a standard parts sheet. This sheet contains information about purchased items that are part of the machine . . . this combined with other drawings constitute what is called a "working drawing package".
Working Drawing Package: A packet of drawings that gives the specifications necessary to manufacture a design. A typical working drawing package includes an assembly drawing, detailed drawings and a standard parts sheet.
Sub-assembly: Two or more parts that form a
portion of an assembly. Can you think of some
examples of sub-assemblies?
Drawings included in a working drawing package should be presented in the following order.
- Assembly drawing (first sheet)
- Part Number 1
- Part Number 2
- ....
- Standard parts sheet (last sheet) contains information about PURCHASED items.
An assembly drawing is a drawing of an entire machine or system with all of its components located and identified.
Detail drawing: A detail drawing is a drawing of an individual part (part number 1 etc), which includes an ORTHOGRAPHIC PROJECTION and dimensions. One detail and/or part per sheet. The purpose of the detail drawing is to show SIZE.
Assembly Drawing Views
Assembly drawing: An assembly consists of a number of parts that are joined together to perform a specific function (like a bicycle). The assembly may be disassembled without destroying any part of the assembly. An assembly drawing shows the assembled machine or structure with all of the parts in their functional position.
An assembly drawing does not normally show size. The purpose of an assembly drawing is to LOCATE parts.
Do assembly drawings need a FRONT, TOP and RIGHT SIDE view? Sometimes. We need as many views as it takes to identify and locate each part. It may only take one view.

Section Views
Sectional views are used quite often when drawing assemblies. Assemblies often have parts fitting into or overlapping other parts and we need to look inside the assembly to see clearly.Section Lines: Section lines in adjacent parts are drawn in opposing directions.
- In the largest area, section lines are drawn at 45°.
- Next largest = 135° (- 45°).
- Additional areas = 30° and 60°.
- Smaller areas = The distance between the section lines may also be varied to further distinguish between parts.
 |
| What angle should the section lines be drawn? |
 |
| 45 degrees |
 |
| - 45 degrees |
 |
| 30 degrees |
 | ||||
| - 30 degrees |
What is included in an assembly drawing?
When deciding what to include in an assembly drawing remember;- The purpose of an assembly drawing is to show how the individual parts fit together. It is not used as a manufacturing print.
- The assembly drawing should not look overly cluttered. Some lines that are necessary in a detailed drawing may be left off the assembly drawing to enhance clearness.
Do we include hidden lines?
They should be used wherever necessary for clearness. They should be left off when they impair clearness. When a section view is used, hidden lines should not be used in that view.Do we include dimensions?
As a rule, dimensions are not given on assembly drawings. If dimensions are given, they are limited to some function of the object as a whole.Part Identification
A part is located and identified, in an assembly drawing, by using a circle containing the part number and a leader line that points to the corresponding part.Parts List
The parts list is an itemized list of the parts that make up the assembled machine. Parts lists contain the;- part number
- part name
- the number required
- material of the part.
Other information can be included, such as, stock sizes of materials and weights of the parts. Parts are listed in order of their part#. Part#’s are usually assigned based on the size or importance of the part. The parts list may be placed in the upper right corner of the drawing (Part# 1 is at the top.) The parts list may be placed in the lower right corner of the drawing. (Part# 1 is at the bottom.)
What is a standard part?
Standard parts include any part that can be bought off the shelf. They do not need to be drawn. Purchasing information is given on the standard parts sheet attached to the back of the working drawing package.What type of information should be included?
- Thread specification (for threaded fasteners)
- Head/Point style or Shape and Name of the fastener
- Fastener length or size
- Fastener series
- Material Special requirements (coatings, finishes, specifications to meet)
- REQ’D (i.e. number required)
Consider the Clamp shown. Sheets of an incomplete working drawing package are given in your textbook. Complete/draw the assembly drawing, the detailed drawings off the individual parts and create a standard parts sheet.
Review the figures shown below, then answer questions 1 through 4. Be sure that you know WHY the answer you choose is correct.
1) How many sheets will be contained in our working drawing package?
2) What sheet number is part#1?
3) What sheet number is the assembly drawing?
4) How many parts will we need to draw a detailed draw of?
To answer question #1: Go back and review what a completed working drawing package includes. Do you remember the drawings (and their proper order) that should be included in a working drawing package?
 |
| Figure (1) |
To answer question #2: To answer this question you must recall the proper order of the drawings indicated in the review of question #1. When you determine this, you will be able to answer question #2.
 | |||
| Figure (2) |
To answer question #3: To answer this one you will again need to know the proper order of drawings to be included in a complete working drawing package.
 |
| Figure (3) |
To answer question #4: You will need to know what a complete working drawing package includes. When you remember this, you will be able to answer this question.
 |
| Figure (4) |
 |
| Figure (5) |
After following the instructions on figure (1) above, review the drawing shown to check your work.
After following the instructions on figure (2) above, review the drawing shown to check your work.
After following the instructions on figure (3) above, review the drawing shown to check your work.
After following the instructions on figure (4) above, review the drawing shown to check your work.
The last step is to create an assembly drawing. When developing an idea or a design concept, the assembly comes first. However, once the design is complete and you are ready to draw the final working drawing package using a computer drawing software, the assembly drawing is completed last. This is simply out of convenience. The assembly drawing is simply constructed by assembling the already drawn details.
After following the instructions on figure (5) above, review the drawing shown to check your work.
PRACTICE PROBLEM 1:
Problem 1: Create a working drawing package for the following Linear Bearing. The working drawing package should contain an assembly drawing, details of all the parts, and a standard parts sheet. Notice that some of the dimensioned isometric drawings are not dimensioned using proper dimensioning techniques. When drawing the detailed drawings use proper symbols and dimensioning techniques.
Post all the required drawing/drawings via eDrawing format on the BlackBoard assignment under the homework tab entitled "Linear Bearing". I am not going to give you detailed instructions on exactly how to accomplish this . . .
I want you to review the material on this lesson, I want you to use your SolidWorks skills, I want you to do the best you can and justify (explain) the way (format) you have chosen to post this assignment.
Were you able to follow the directions to the letter, or because of various reasons (such as
differing skill levels), did you have to modify them because you couldn't figure out how to do
a title block as shown, or how to create a multi-page drawing and post it in eDrawing format.
You should have only one drawing file, but you should have multiple pages within that one file. You may have questions about how to do this, if so, I want you to use your best judgment and submit these drawings in the way that you think best (not every student is at the same skill level).
Part of the assignment will be an explanation (justification) of why you submitted your assignment a particular way that was not exactly according to the directions. Just tell me why you submitted individual drawing files or why you chose to submit only one drawing file with multiple pages etc).
Many times (in the real world) it often unclear as to how to proceed. "The professional" is not expected to read the bosses mind, but he is expected to use his best judgment and to then "justify" why he did things a particular way. If needed, such an explanation is part of your assignment on this project.
Use the information provided, the solutions will be revealed in later images.
 |
| Figure (A) |
Draw a detailed drawing of the Guide Shaft (Part#2). If you are just studying the basics and have not covered tolerancing, ignore the RC4 tolerance. NOTE: This part is symmetric and all fillets are R.12. When you have completed the drawing check with image at end of lesson below .
Use the information provided, the solutions will be revealed in later images.
 |
| Figure (B) |
Draw a detailed drawing of the Top Plate (Part#3). If you are just studying the basics and have not covered threads and fasteners, replace the 16X 10 - 24 UNC dimension with a 16X n.19 dimension. When you have completed the drawing check with image at end of lesson below.
Use the information provided, the solutions will be revealed in later images.
 |
| Figure (C) |
Draw a detailed drawing of the Pillow Block (Part#4). If you are just studying the basics and have not covered tolerancing, ignore the FN1 dimension. When you have completed the drawing check with image at end of lesson below.
Use the information provided, the solutions will be revealed in later images.
 |
| Figure (D) |
Draw a detailed drawing of the Bearing (Part#5). If you are just studying the basics and have not covered tolerancing, ignore the FN1and RC4 dimensions. When you have completed the drawing check with image at end of lesson below.
Use the information provided, the solutions will be revealed in later images.
 |
| Figure (E) |
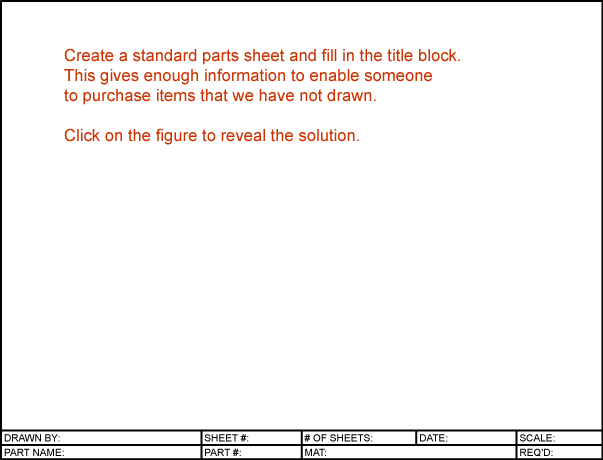
Using the format given in figure (F), create a standard parts sheet.
 |
| Figure (F) |
Draw a complete assembly drawing. When you have completed the drawing. Use the information provided, the solutions will be revealed in later image.
|
| Figure (G) |
Answer to figure (A)
Answer to Figure (C)
Answer to Figure (D)
Answer to Figure (E)
Answer to Figure (F)
The End of lesson on Assembly Drawings
Thanks for sharing valuable Information, I really very impressive on your blog. I hope you continue on blogging job. If you want to know more info about As Constructed Drawings.
ReplyDeleteThanks for sharing a nice blog. Really I am very happy to read these blogs. Here We are sharing very useful information about you. Click Here : Assembly Drawing Services
ReplyDeleteThank you for sharing our blog! We truly appreciate your support. If you're interested in more insights about assembly manufacturers, feel free to check us out here
ReplyDelete